


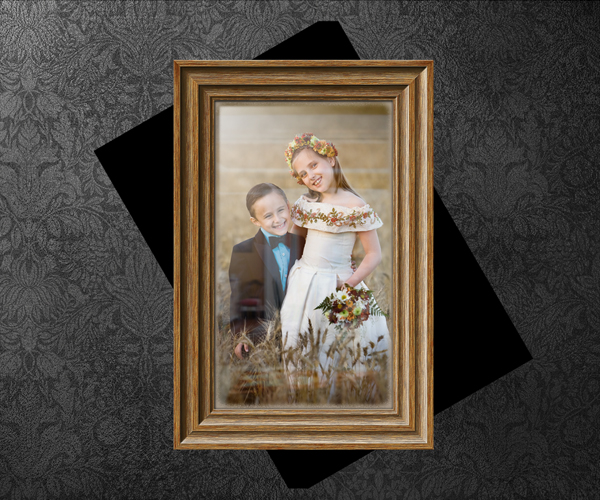
Final Image Preview

Step 1
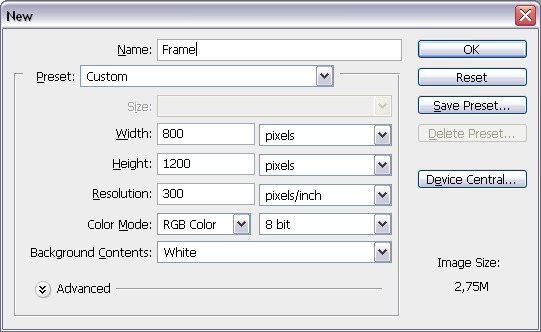
First we'll create the frame. Although our final image will be 1200 pixels wide and 800 pixels high, we'll start by drawing a frame which is bigger than our final image. Thus we'll have more detail on the frame, then we'll scale it down to fit in our final composition. Now create a new document using the settings shown below.
Step 2
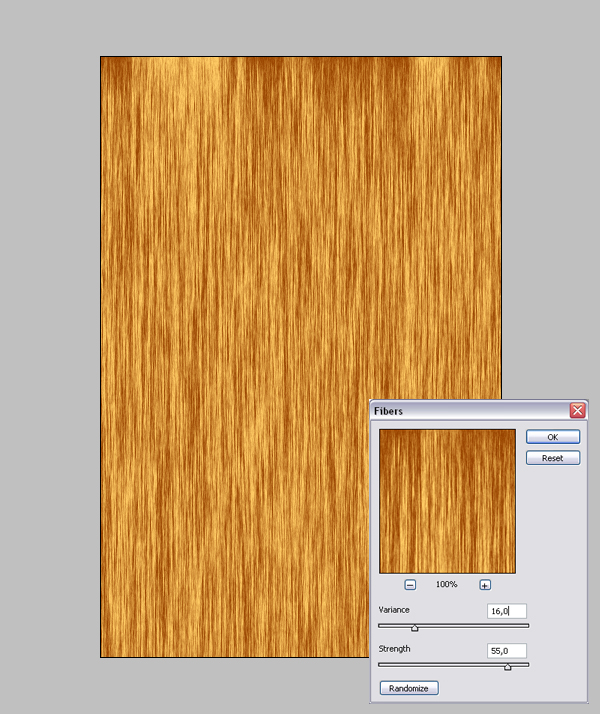
Create a new layer and name it "Wood." Set your Foreground Color to #994400 and Background Color to #ffcc66. Fill the layer with your Foreground Color. Go to Filter > Render > Fibers. Set the Variance to 16 and Strength to 55, then apply.
Step 3
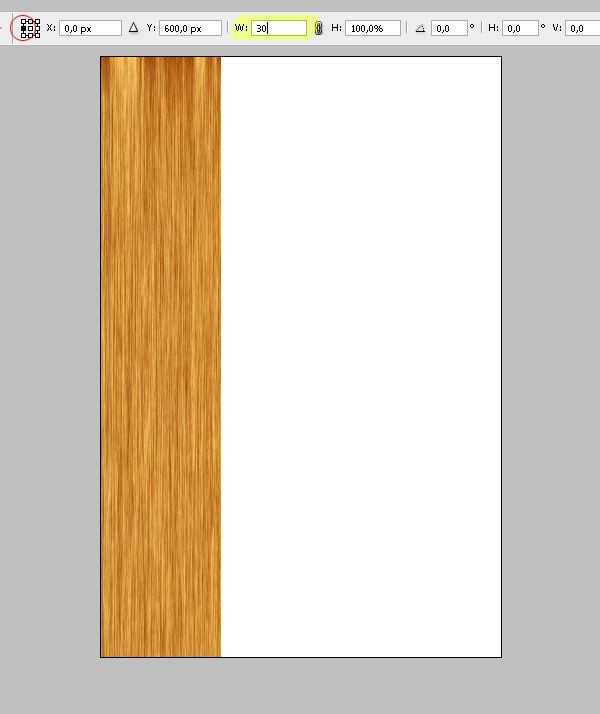
Hit Command + T to enter Free Transform mode, set the Reference Point Location to middle-left, set the Horizontal Scale to 30%, and hit Enter twice to apply. Scaling the layer down horizontally makes the texture more dense.
Step 4
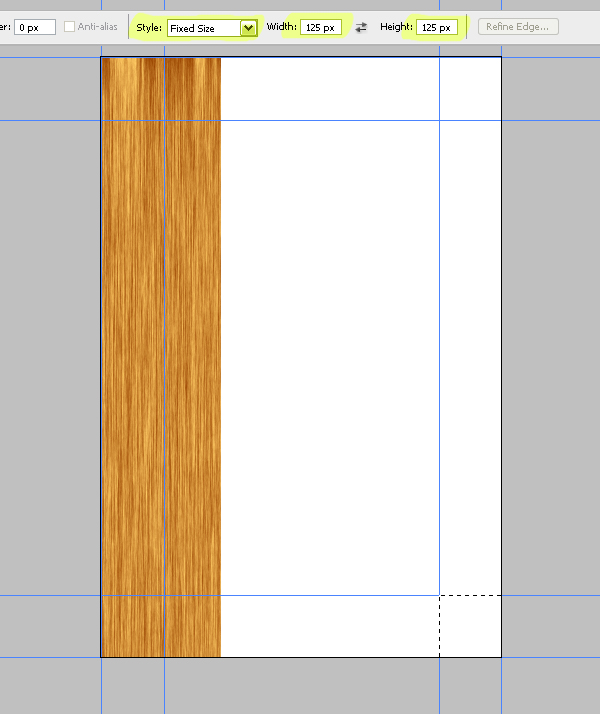
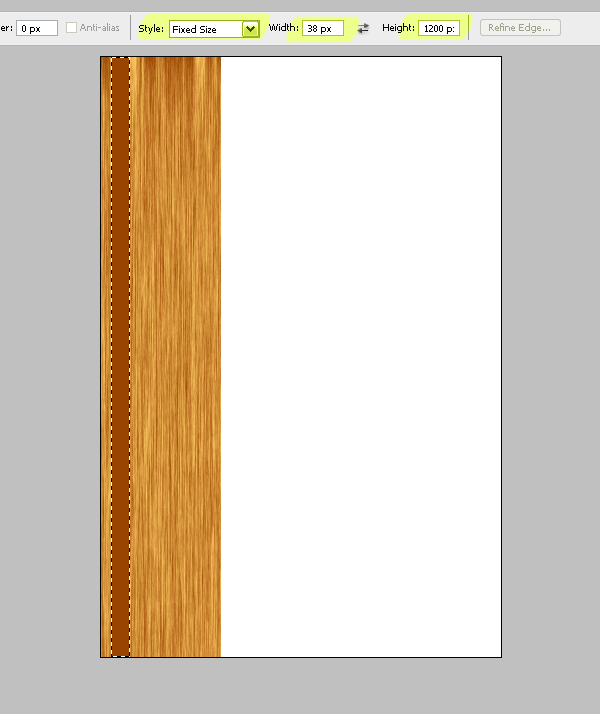
Get the Rectangular Marquee Tool, set the Style to a Fixed Size and set the Width and Height to 125 pixels. Click anywhere on the canvas, then move the selection to the top-left corner of the canvas. Drag two horizontal and two vertical guides from the rulers (Hit Command + R to make them visible if they are not) and snap them to the edges of the selection. Move the selection to the bottom-right corner of the canvas, then drag the guides around the selection as shown below.
Step 5
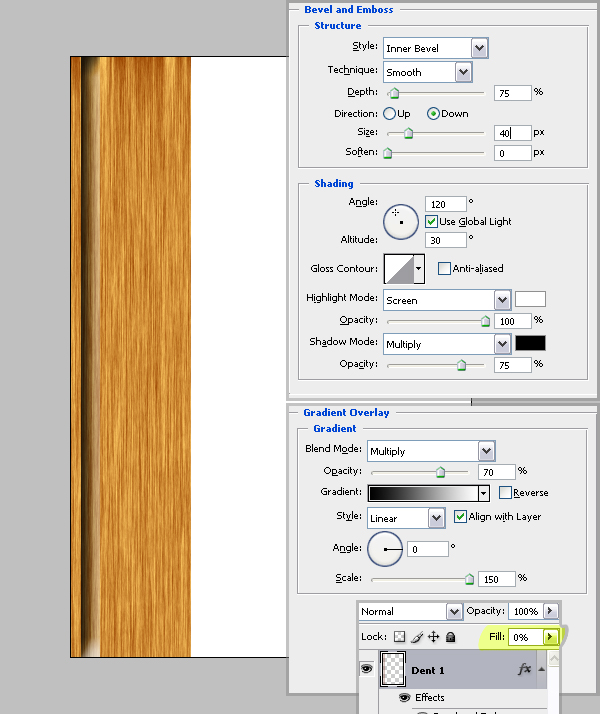
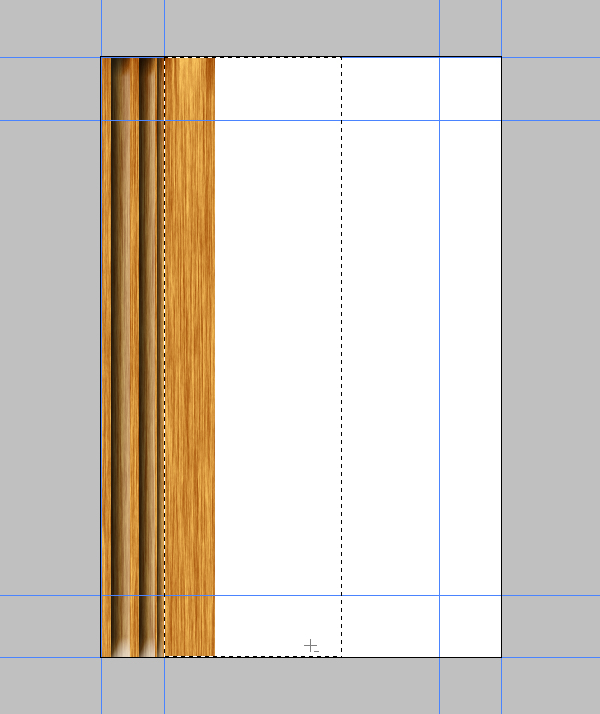
Create a new layer and name it "Dent 1." Get the Rectangular Marquee Tool, make sure Style is set to Fixed Size, then set the Width to 38 pixels and Height to 1200 pixels. Make a selection as shown below. The selection I made is 20 pixels away from the left edge, so you can place the selection to the most left of the canvas and move it 20 pixels right by hitting the Right Arrow key two times, do this while holding the Shift key. Fill the selection with the Foreground color and the Deselect.
Step 6
This rectangle is going to be one of the dents in our wooden frame. We'll now apply two layer styles to it. First set the layer's Interior Opacity (Fill) at 0%. Now apply a Bevel and Emboss layer style to the layer using these settings: Style set to Inner Bevel, Depth set at 75%, Direction set to Down, Size set to 40 pixels, and Highlight Mode Opacity set at 100%. Next, apply a Gradient Overlay and use the following settings: Blend Mode of Multiply, Gradient set at Black to White, Opacity set at 70%, Angle set to 0 degrees, and Scale set at 150%.
Step 7
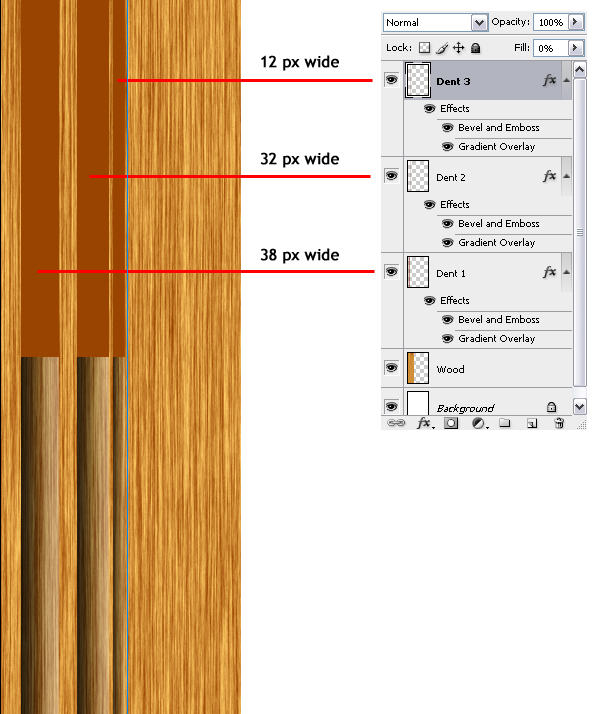
We are going to make two more dents. Create a new layer named "Dent 2." Get the Rectangular Marquee Tool and set the Width to 32 pixels and make a selection. Snap the right edge of the selection to the second vertical guide and move the selection 18 pixels left. Fill the selection with the Foreground Color. Create another new layer and name it "Dent 3."
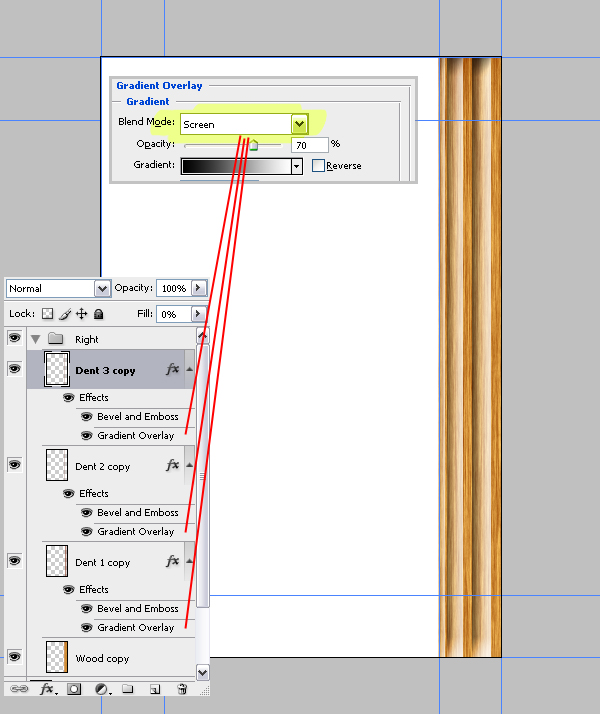
Make another rectangular selection which is 12 pixels wide and place it 2 pixels left from the second guide, as you can see in the below image, then fill with the Foreground Color again and Deselect. Now go back to the "Dent 1" layer in the Layers palette, go to Layer > Layer Style > Copy Layer Style. Select both "Dent 2" and "Dent 3" layers in the Layers Palette, then go to Layer > Layer Style > Paste Layer Style.
Step 8
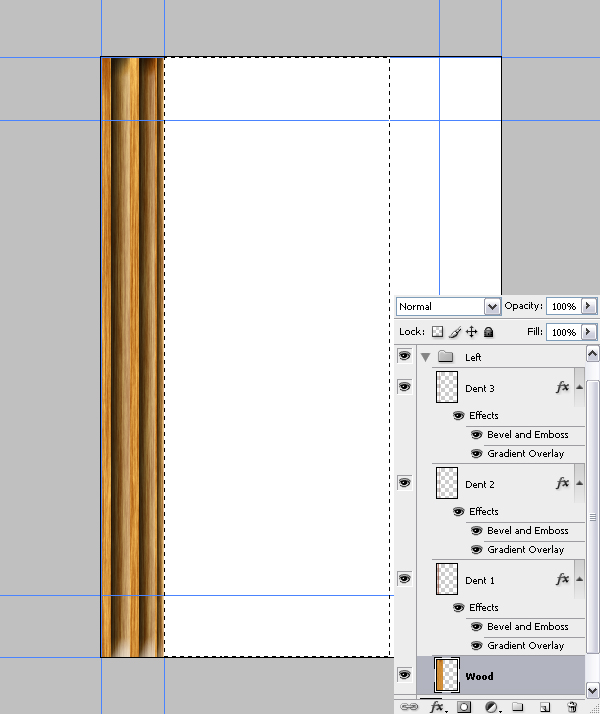
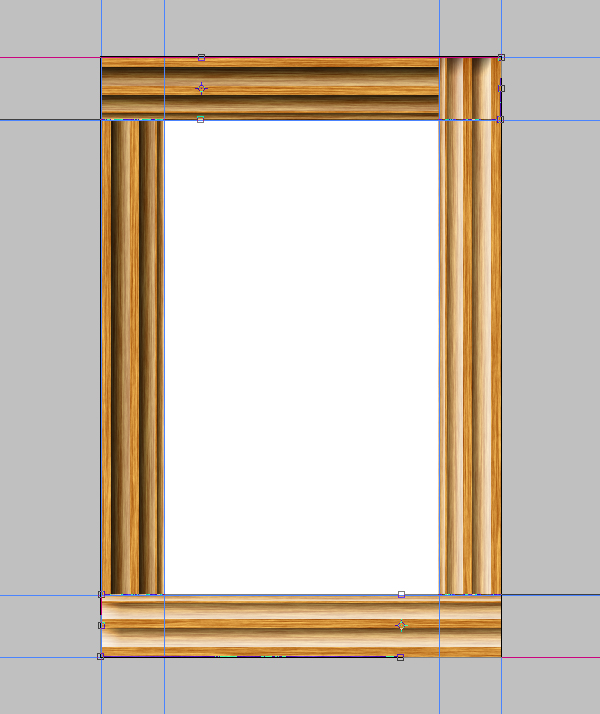
Now we're almost done with the left piece of our wooden frame. Select all Dent layers and the "Wood" layer in the Layers Palette and go to Layer > New > Group From Layers. Name the group "Left." Duplicate the "Left" layer group and name it "Right." Make the "Right" layer group invisible for now.

Step 9
Go back to the "Left" layer group, open it, then go to the "Wood" layer. Also, make sure Guides are visible. Grab the Rectangular Marquee Tool, set the Style to Normal, and make a selection as shown below, and hit Delete to clear the selected area. Deselect by hitting Command + D. Select the "Left" group in the Layers palette and go to Layer > Merge Group (Command + E).
Step 10
Go to the "Right" layer group in the Layers Palette and open it. Select the "Wood" layer and go to Edit > Transform > Flip Horizontal. This way we won't have the exact same texture in for the left and right pieces. Get the Rectangular Marquee Tool and make a selection as shown, then clear by hitting Delete. Deselect by hitting Command+ D.
Step 11
Select the "Right" Layer Group and go to Edit > Transform > Flip Horizontal. Move the layer group to the right of the canvas as shown. Open the layer group and change the Blend Mode of each Dent layers' Gradient Overlay Layer Style from Multiply to Screen. Select the "Right" Layer Group in the Layers Palette and hit Command + E to merge.
Step 12
Duplicate the "Right" layer and name it "Bottom." Hit Command + T and rotate it 90 degrees, then place it at the bottom of the canvas. Duplicate the "Left" layer and name it "Top." Rotate it 90 degrees, then place it at the top of the canvas. Go to the Layers palette and drag the "Top" layer above the "Right" layer.
Step 13
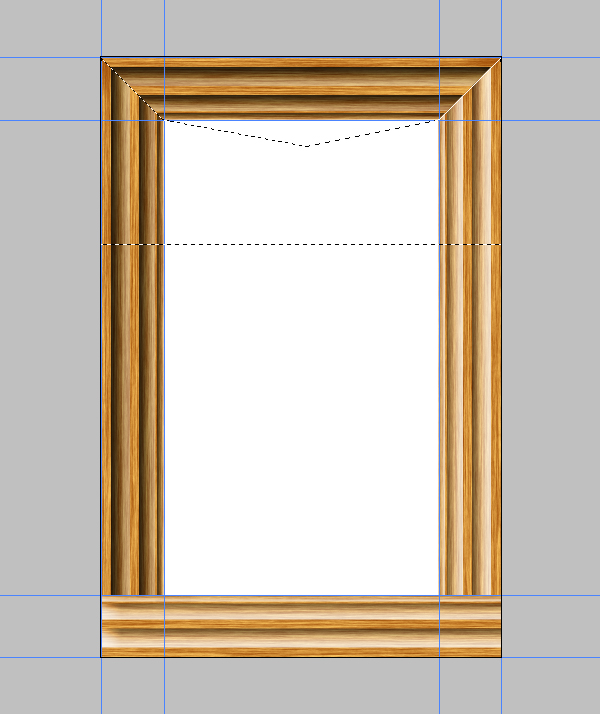
Grab the Polygonal Lasso Tool and make a selection with the help of the guides, as shown below, then hit Delete to clear.
Step 14
Go to the "Bottom" layer in the Layers Palette and do the same thing for the bottom part: Make a selection as shown with the Polygonal Lasso Tool and hit clear. Go to the Layers Palette and select all layers except for the "background" layer, then merge them by hitting Command + E. Name the merged layer "Frame."

Step 15
Hit Command + A to select all and then hit Command + C to copy. Go to the Channels Palette and create a new channel. Hit Command + V to paste. Go to Filter > Artistic > Paint Daubs. Set the Brush Size to 1, Sharpness to 10, and set the Brush Type at Simple. Command-click the Alpha Channel to load the white areas as a selection.

Step 16
Go to the Layers Palette and select the "Frame" layer. Go to Layer > New > Layer via Copy and name the new layer "Bumps." Apply a Drop Shadow to the "Bump" layer with these settings: Blend Mode set to Multiply, Opacity at 90%, Angle set to 120 degrees, Distance and Size set to 3 px.
Apply an Inner Shadow layer style using these settings: Blend Mode set at Color Burn, Opacity at 100%, Angle set at 120 degrees, and Distance and Size set to 0 px. Next, apply a Bevel and Emboss layer style and use these settings: Style set to Inner Bevel, Depth at 1000%, Direction set at Down, and Size set to 0 px.

Step 17
Now select all the layers other than the "Background" layer and merge them by hitting Command + E. Name the merged layer "Frame." Now we need a photo to put inside the frame. I used a photo from Stock.xchng, uploaded by papaleguas. You can download it here.
Open it in Photoshop and drag the image into your "Frame" document, place it beneath the "Frame" layer, then scale and position as shown below. Name this layer "Photo."
Go to the "Frame" layer and apply an Outer Glow Layer Style using these settings: Blend Mode of Multiply, Opacity set at 40%, Color set to black, and Size set to 9 px. Now apply a Drop Shadow with these settings: Blend Mode set to Multiply, Opacity at 35%, Angle set to 120 degrees, Distance set to 3 px, and Size set to 9 px.

Step 18
It is now time to make the glass. Actually, we'll make the reflections. You can get the image that is reflected on the glass here. It's a photo from Stock.xchng uploaded by the swedish.
Open it in Photoshop and drag it into your "Frame" document, then scale and place as shown below image. Go to Filter > Blur > Gaussian Blur and apply with a Radius of 3 pixels. Set the Layer Blending Mode to Screen and Opacity at 15%. Name this layer "Ref 1."
We need two reflections on the glass, so duplicate the "Ref1" layer and name it "Ref 2." Move the "Ref2" layer five pixels left.

Step 19
Create a new layer above the "Ref2" layer and name it "Highlight." Grab the Rectangular Marquee Tool and make a selection as shown. Get the Gradient Tool, set the Gradient to Foreground as Transparent and set it to a Radial Gradient. Select white as the Foreground color. Fill the selection as shown and Deselect.

Step 20
Hit Command + T and scale the highlight down horizontally and up vertically, as shown below. Go to Filter > Blur > Gaussian Blur and apply with a Radius of 3 pixels.

Step 21
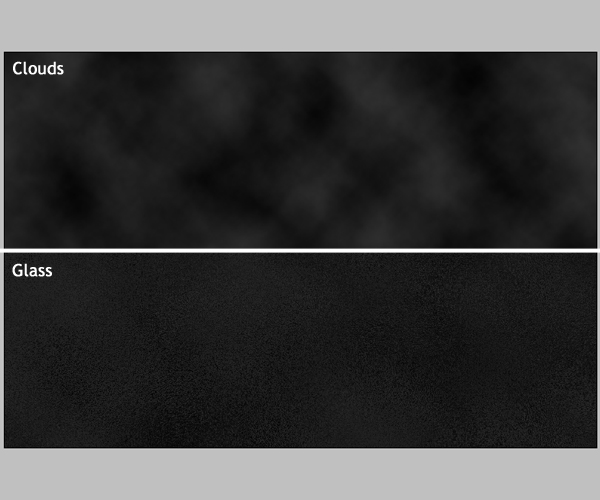
Now we'll make the dirty edges of the glass. Go to the Channels Palette, create a new channel, and name it "Dirt1." Go to Filter > Render > Clouds. Go to Filter > Artistic > Film Grain, set the Grain to 9, set the Highlight Area and Intensity to 0, and hit OK. Go to Filter > Brush Strokes > Accented Edges, then set the Edge Width to 1, Edge Brightness to 20, Smoothness to 1 and apply.

Step 22
Create another channel and name it "Dirt Area." Make sure the guides are visible. Grab the Rounded Rectangle Tool, set it to Fill Pixels, set the Radius to 25 pixels, and choose white as your Foreground color. Draw a rectangle as shown below.

Step 23
Go to Filter > Blur > Gaussian Blur and apply with a Radius of 15 pixels. Go to Image > Adjustments > Levels (Command + L) and set the Shadow Input Level to 200 and Highlight Input Level to 220. Now apply another Gaussian Blur filter, this time with a Radius of 7 pixels.
Now go to Image > Adjustments > Invert (Command+I). This channel will define the area that the dirt will be visible in. Now Command-click the channel in the Channels Palette to make a selection out of the white areas. Alt + Command-click the "Dirt" channel to select where the white area of the "Dirt" channel intersects the already selected area.

Step 24
Go to the Layers Palette and create a new layer below the "Frame" layer, then name it "Dirt1." Fill the selection with the color #a79988. Go to the Channels Palette again, then Command-click the "Dirt Area" channel to load the selection. Go back to the Layers palette and create a new layer above the "Dirt1" and name it "Dirt2." Fill the selection again with the color #a79988.

Step 25
The frame is almost finished. Before we merge the layers, lets make some final adjustments. Go to the "Frame" layer and hit Command + U to bring up the Hue/Saturation dialog. Set the Saturation to -15. Go to the "Photo" layer, press Command + U again and set the Lightness to -10 and apply. Now we're ready! Go to Layer > Flatten Image.

Step 26
Now we can start making the wall. Let's create a new document 1200 pixels wide and 800 pixels high with a resolution of 300 pixels/inch. Create a new layer and name it "Wall." Set your Foreground to 85% gray and Background Color to black. Go to Filter > Render > Clouds. Go to Filter > Distort > Glass. Set Distortion to 20, Smoothness to 1, Scaling to 120%, and set the Texture to Frosted.
Step 27
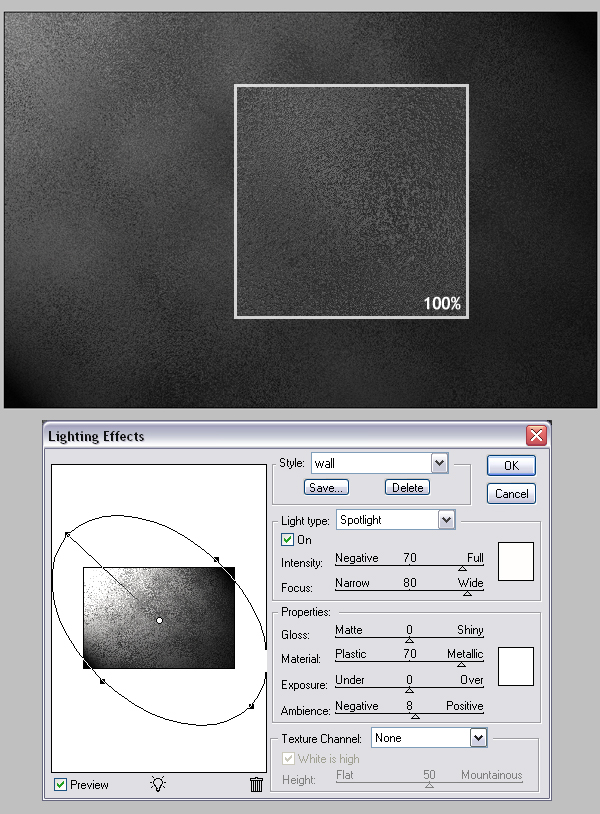
Go to Filter > Render > Lighting Effects and apply with the settings from the image below. Next we'll cover the wall with a wallpaper. I used the "Free Wallpaper Patterns for PS7+" by c130 which I downloaded from the Brusheezy web site. You can download the Photoshop pattern here.
Step 28
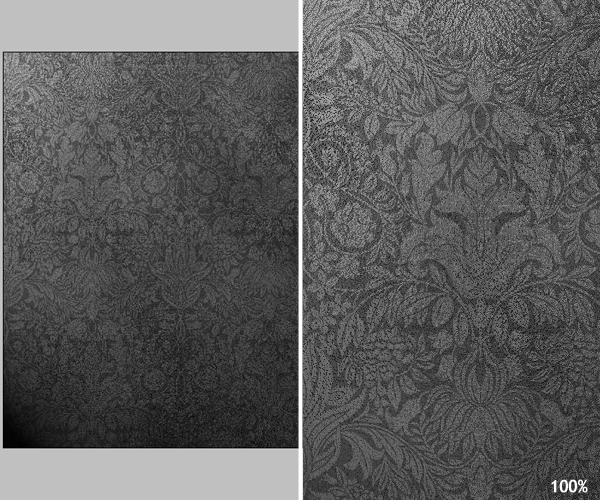
Copy the "wallpapers.pat" to the Presets\Patterns folder in your Photoshop directory. Apply a Pattern Overlay Layer Style to the "Wall" layer and use these settings: Blend Mode set to Overlay, Opacity at 20%, Pattern set to Floral. To load the patterns you downloaded, open the Pattern Picker, then click the little triangle icon to open the menu and select Load Pattern, then pick the "wallpapers.pat" file.
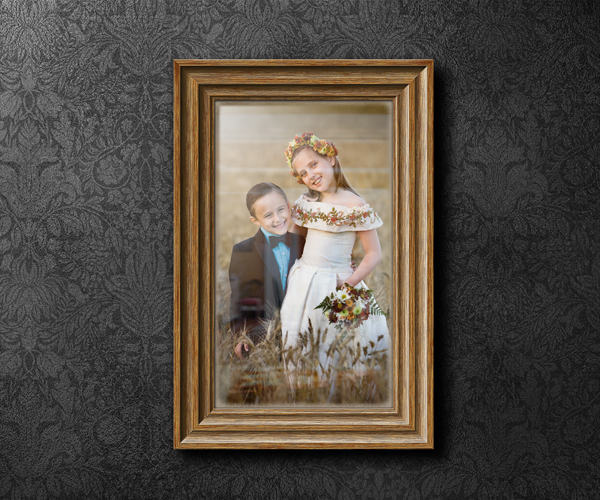
Step 29
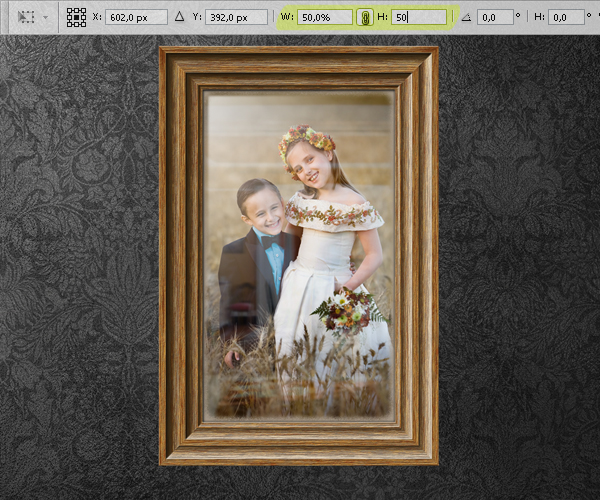
Go to your "Frame.PSD" document and drag the image to the "Wall.PSD" document, do this while holding down the Shift key so it is centered on the wall. Name the layer "Frame." It needs to be scaled down so hit Command + T and set the Horizontal and Vertical Scales to 50% and apply.
Step 30
Create a new layer below the "Frame" layer and name it "Shadow." Command-click the "Frame" layer thumbnail to load it's pixels. Fill the selection with black and Deselect. Hit Command + T and rotate -30 degrees. Hold down the Alt key and press the Right Arrow key twenty times. Select all the shadow layers in the Layers Palette and merge them by hitting Command + E.
Step 31
Hit Command + T and rotate the shadow 30 degrees. Go to Filter > Blur > Gaussian Blur and apply with a Radius of 10 pixels, then place the shadow as shown.
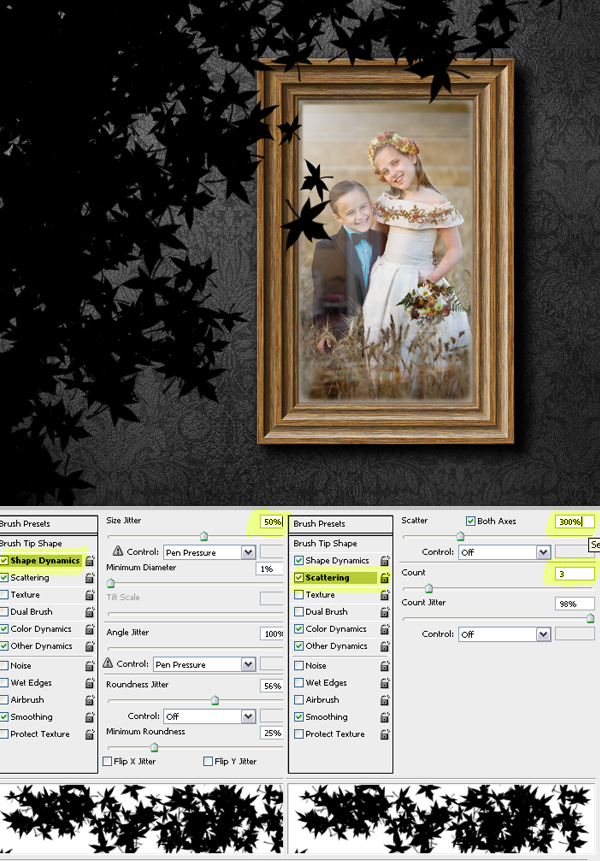
Step 32
Create a new layer on top and name it "Tree Shadow." Get the Brush Tool, pick Scattered Maple Leaves brush and set the Master Diameter to 130 px. Open the Brushes panel and Under Shape Dynamics, set Size Jitter to 50% and Under Scattering set Scatter at 300% and Count to 3. Set the Foreground Color to black and paint as shown.
Conclusion
As the final step, go to Filter > Blur > Gaussian Blur and apply with a Radius of 50 pixels. Set the Opacity of the layer at 70%. This will give us some light and shade and also the frame will become the focus of the illustration. That's it! Hope you found this tutorial useful! You can view the final image below or view a larger version here.


